Easy Rice Krispie Treat Pumpkins – Fun Fall Dessert
Rice Krispie Treat Pumpkins are the ultimate festive snack that will charm everyone at your Halloween gathering! Forget complicated baking – these adorable, no-bake delights are incredibly simple to whip up, making them perfect for little helpers in the kitchen. There’s a reason why we all adore classic Rice Krispie treats: that perfect chewy, sweet texture combined with the satisfying crunch of cereal is pure comfort food magic. But when you transform them into these playful pumpkins, they become something truly special. Imagine a table adorned with these vibrant orange cuties, each one a miniature work of art ready to be devoured. They’re not just a treat; they’re a happy memory in the making, guaranteed to bring smiles and squeals of delight. Get ready to fall in love with Rice Krispie Treat Pumpkins all over again!

Rice Krispie Treat Pumpkins
Get ready for some festive fun with these adorable and delicious Rice Krispie Treat Pumpkins! These are perfect for Halloween parties, classroom treats, or just a delightful autumn activity to do with the kids. They’re surprisingly easy to make, and the result is a charming and tasty treat that everyone will love. We’ll be transforming those classic, gooey Rice Krispie treats into miniature pumpkins, complete with little stems. The vibrant orange color is a key element, and we’ll achieve that easily with a touch of food coloring. Plus, the candy additions add a sweet surprise and a touch of visual appeal. Let’s dive into what you’ll need and how to bring these pumpkin-shaped delights to life!
Ingredients:
- 1/4 cup Butter
- 1 bag large marshmallows (approximately 40 marshmallows)
- 6 cups Rice Krispies
- Red & Yellow Liquid Food Coloring
- Mini Rolos
- Green M&M’s
- 1/4 cup cooking oil or melted butter in a small bowl (to keep it from sticking to your hands)
Instructions:
Preparing Your Pumpkin Base
1. First things first, gather all your ingredients and have them ready to go. This is a pretty quick process once the marshmallows are melted, so it’s helpful to have everything measured out. Grab a large pot or a Dutch oven and place it over medium-low heat. Add your 1/4 cup of butter to the pot. Allow the butter to melt completely, swirling the pot occasionally to coat the bottom. You don’t want the butter to brown, just melt gently.
2. Once the butter is fully melted, add the entire bag of large marshmallows to the pot. Stir the marshmallows constantly with a spatula or wooden spoon. This is where the magic starts! Keep stirring until the marshmallows are completely melted and smooth. It’s important to keep the heat on medium-low to prevent the marshmallows from scorching. You’re looking for a beautifully gooey, unified mass. Once smooth, remove the pot from the heat.
3. Now it’s time to add the star cereal! Gradually add the 6 cups of Rice Krispies to the melted marshmallow mixture. Gently fold the cereal into the marshmallows, ensuring each crispy flake is coated. You want to be thorough but also gentle so you don’t crush the Rice Krispies too much, as that can affect the final texture. Continue to stir until all the Rice Krispies are evenly distributed.
Creating the Perfect Pumpkin Orange
4. This is the fun part where we transform our Rice Krispie mixture into a vibrant pumpkin orange! While the mixture is still warm and pliable, it’s time for the food coloring. In a separate small bowl, I like to mix my red and yellow food coloring together first to get the perfect pumpkin shade. Start with a few drops of yellow and then add a drop or two of red. You can always add more, but you can’t take it away, so it’s best to build up the color gradually. Add the colored mixture to your Rice Krispie treat base. Stir it in thoroughly, ensuring the color is distributed evenly throughout the entire batch. Keep stirring until you achieve a consistent, bright pumpkin orange color. The warmth of the mixture will help the color blend beautifully.
Shaping Your Pumpkin Treats
5. Now, prepare your workspace. You’ll need the small bowl with 1/4 cup of cooking oil or melted butter. Lightly grease your hands with this oil or melted butter. This is a crucial step to prevent the sticky Rice Krispie mixture from clinging to your hands. Take about a 1/4 cup portion of the Rice Krispie mixture at a time and gently roll it into a ball in your greased hands. Then, slightly flatten the ball to resemble the shape of a small pumpkin. Don’t worry if they aren’t perfectly round; a slightly irregular shape adds to their charm!
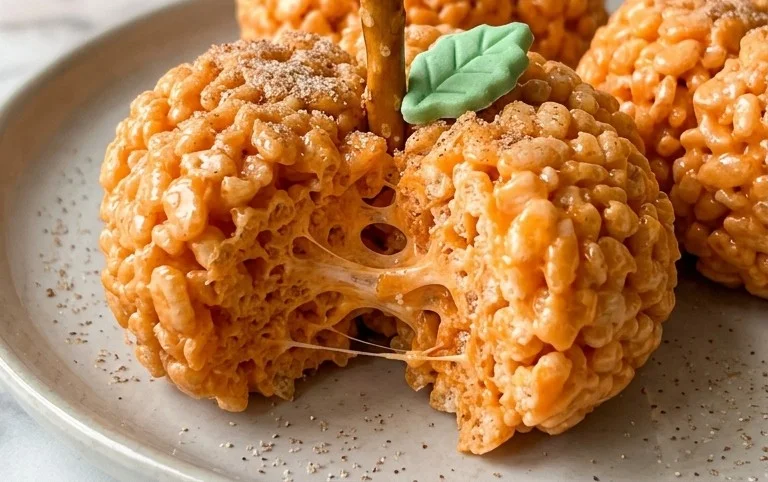
6. Once you have your pumpkin shapes formed, it’s time to add the finishing touches. Take a Mini Rolo and gently press it into the top center of each pumpkin treat to create the stem. The Rolo will slightly embed itself into the warm Rice Krispie mixture, making a secure and sweet stem. For the final touch, press a single Green M&M into the top of the Rolo stem to represent a little leaf or vine. You can also gently press the sides of your pumpkin with your greased fingers to create slight indentations, giving them a more realistic pumpkin appearance if you desire. Continue this process until you have used up all your Rice Krispie mixture. Allow the pumpkins to cool and set completely at room temperature. This usually takes about 30 minutes to an hour. Once firm, they are ready to be enjoyed or displayed!
Conclusion:
And there you have it! Creating these delightful Rice Krispie Treat Pumpkins is a wonderfully simple and rewarding project, perfect for bakers of all skill levels. The beauty of this recipe lies in its adaptability and the pure joy it brings, especially during the festive autumn season. They’re not just delicious; their vibrant orange hue and cute pumpkin shape make them a fantastic centerpiece for any fall gathering or a fun activity to do with kids. Imagine the smiles when you present these on your dessert table!
These treats are incredibly versatile. Serve them as is for a quick and easy Halloween or Thanksgiving dessert. They also make charming additions to lunchboxes for a special surprise, or can be given away as homemade party favors. Get creative with your decorating! You can use different shades of orange candy melts, add edible glitter for sparkle, or even pipe on little faces with black icing for a spookier effect. Don’t be afraid to experiment with other seasonal shapes, too – maybe little ghosts or candy corn!
I truly encourage you to give this Rice Krispie Treat Pumpkins recipe a try. It’s a low-stress, high-reward treat that’s guaranteed to be a hit. The process is so satisfying, and the end result is just as delightful as the taste. Happy baking and happy fall!
Frequently Asked Questions:
Can I make these ahead of time?
Absolutely! Rice Krispie treats are excellent for making in advance. You can prepare them a day or two before your event. Store them in an airtight container at room temperature, ensuring they are completely cooled and any decorations are set.
How do I get the perfect pumpkin shape?
The key to the pumpkin shape is gentle molding while the mixture is still warm but cool enough to handle. Lightly butter your hands or use a small amount of cooking spray. Press the mixture into slightly flattened spheres, then use a knife or skewer to gently create indentations for the “ribs” of the pumpkin, and add a small piece of pretzel or candy for the stem.
What are some other color variations?
While orange is classic for pumpkins, you can easily adapt this recipe for other colors! Use green candy melts for little alien heads, yellow for mini suns, or even purple for festive spooky shapes. The possibilities are endless for themed parties or just for fun!
Rice Krispie Treat Pumpkins
Adorable and easy Rice Krispie treat pumpkins perfect for Halloween or fall-themed parties.
Ingredients
-
1/4 cup Butter
-
1 bag large marshmallows
-
6 cups Rice Krispies
-
Red & Yellow Liquid Food Coloring
-
Mini Rolos
-
Green M&M’s
-
1/4 cup cooking oil
Instructions
-
Step 1
Melt butter in a large saucepan over low heat. -
Step 2
Add marshmallows and stir until completely melted. Remove from heat. -
Step 3
Add red and yellow food coloring to achieve a pumpkin orange color. Stir well. -
Step 4
Add Rice Krispies cereal and stir until well coated. -
Step 5
Grease hands with cooking oil. Shape the mixture into pumpkin shapes. -
Step 6
Press a mini Rolo into the top of each pumpkin to create a stem. -
Step 7
Add a green M&M on top of the Rolo for a vine.
Important Information
Nutrition Facts (Per Serving)
It is important to consider this information as approximate and not to use it as definitive health advice.
Allergy Information
Please check ingredients for potential allergens and consult a health professional if in doubt.